Notes
Change default screenshot save location for gnome-screenshot on Ubuntu
Ubuntu
4 minutes
NOTE: Ubuntu 22.04 saves screenshots in ~/Pictures/Screenshots by default. The new interactive utility that let’s you specify the location when you save. If for some reason it is not saving in ~/Pictures/Screenshots when you use the keyboard shortcuts, try using the GUI interface and save a screenshot to your desired location (the keyboard shortcuts appear to use the last saved location)
tl;dr
1# sudo apt install gnome-screenshot
2gsettings set org.gnome.gnome-screenshot auto-save-directory "/home/aamnah/Pictures/Screenshots"
This will only work if you add a custom keyboard shortcut as well and use that to take the screenshots.
System settings are saved in the dconf configuration system, and you can either set them with gsettings set or dconf write. Updating gsettings (high-level configuration system ) is preferred over directly writing to dconf (back end). Alternatively, you can edit them in a GUI with dconf-editor.
You can update the auto-save-directory for gnome-shortcut with the gsettings set org.gnome.gnome-screenshot auto-save-directory "/home/aamnah/Pictures/Screenshots" command. But the setting no longer works in Gnome 3.8. It’s a known bug considered as RESOLVED WONTFIX ref. As a result of the bug, it still saves in ~/Pictures folder even after updating the directory setting.
Just editing dconf values for gnome-screenshot won’t work. There are two workarounds: Either create a custom keyboard shortcut that uses gnome-screenshot after setting the path in dconf-editor, or use gnome-tweaks with an extension called Screenshot Locations.
Below are details on how to update the auto-save-directory setting and how to create custom keyboard shortcuts
Update path for save location
Run the following command in the Terminal
1gsettings set org.gnome.gnome-screenshot auto-save-directory "/home/aamnah/Pictures/Screenshots"
Replace /home/aamnah/Pictures/Screenshots with your desired path.
The location needs to be an absolute path, i.e. /home/YOUR_USERNAME/Pictures/Screenshots. (Try adding file:// at the beginning of the path if this doesn’t work). Do NOT use environment variables like $HOME or $USER in the path, variable expansion doesn’t work.
Logout and login again for the change to take effect.
Alternatively, you can use a GUI interface like dconf-editor
1sudo apt install dconf-editor
Start dconf Editor. Go to org / gnome / gnome-screenshot and edit auto-save-directory and add your desired location. Follow the path rules mentioned above.
Logout and login again for the change to take effect.
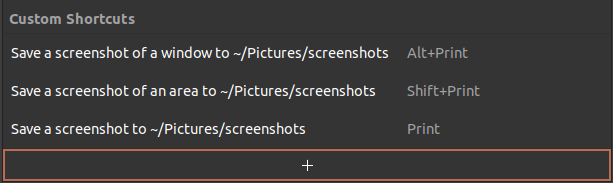
Add a custom keyboard shortcut
You can use gnome-screenshot to save wherever you want, just create a custom keyboard shortcut for it in the keyboard settings panel. There won’t be a configuration option to do this in gnome-settings-daemon, as it’s already trivially possible to work-around this lack of configuration. Bastien Nocera
meh.. So, create a custom keyboard shortcut, shall we?
Go to Settings > Keyboard Shortcuts, there will be an entire section for Screenshots. You can either override these or create new ones with different key bindings.. If you are overriding an existing key combination, make sure you have disabled it first by clicking on it and pressing Backspace (In Ubuntu 22.04 you don’t have to worry about this. Adding an existing key binding again will disable the old one).
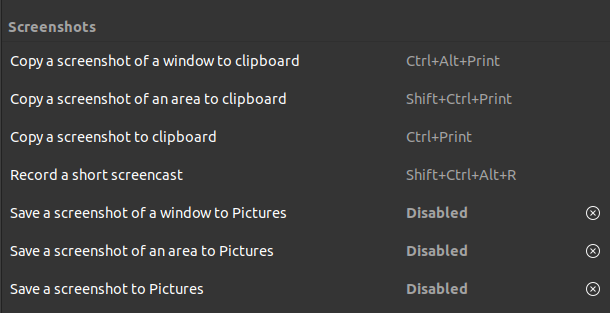
Scroll down to the bottom and click the + button
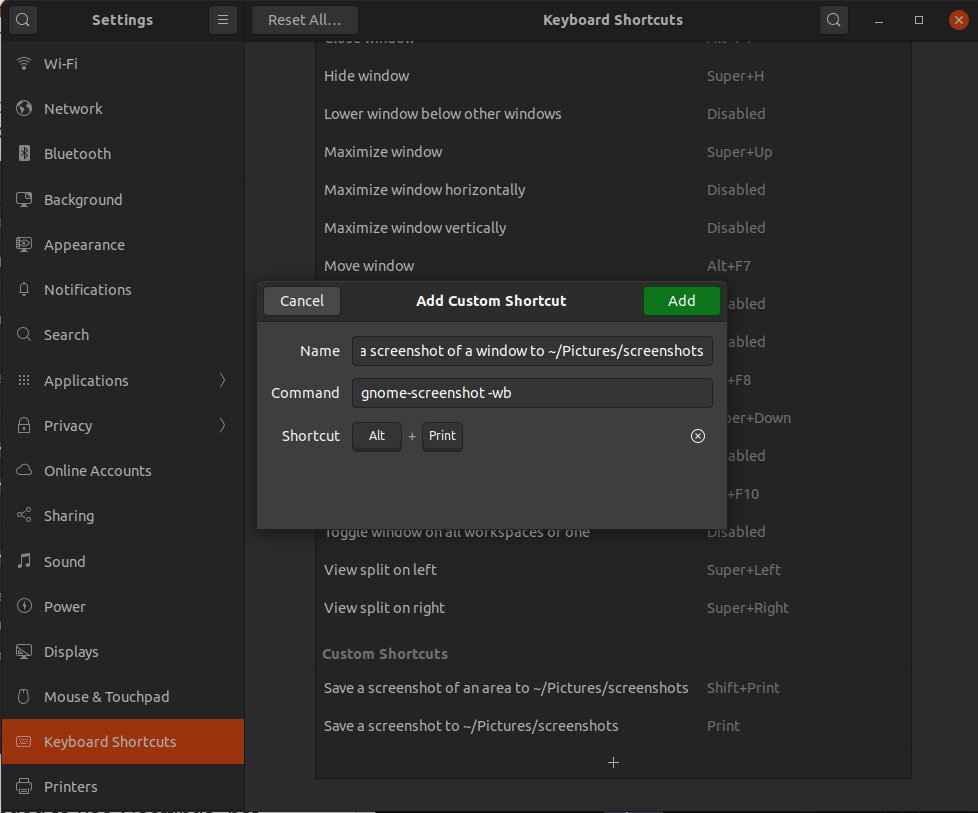
| Name | Command | Shortcut |
|---|---|---|
| Save a screenshot of a window to ~/Pictures/Screenshots | gnome-screenshot -w | Alt+Print |
| Save a screenshot of an area to ~/Pictures/Screenshots | gnome-screenshot -a -p | Shift+Print |
| Save a screenshot to ~/Pictures/Screenshots | gnome-screenshot |
I also updated all names to say ~/Pictures/Screenshots instead of Pictures.
To check what flags are available, run gnome-screenshot --help. Here are some common ones:
-aor--areais for selecting an area of the screen-wor--windowis for grabbing a window instead of an entire screen-por--include-pointeris for including the pointer with the screenshot
Update: The -b option to include border (shown in the screenshot) is now deprecated. The border is always included now.
Re-login for the change in location to take effect.